
How Doctors Can Use 3D Anatomy Visuals to Improve Patient Explanations
Patients rarely say, "I did not understand the anatomy." They say, "I am still not sure what is wrong."
That sentence matters because it points to a problem many doctors feel but do not always name clearly. The consultation may be clinically correct, yet the patient leaves without a usable mental model of the structure involved, why it hurts, or what the treatment plan is trying to change.
In 2026, that communication gap is getting harder to ignore. Patients increasingly arrive with AI-shaped questions, half-understood searches, and anxiety amplified by fragmented explanations online. That makes the physician's job more demanding, not less. Clear anatomical explanation is no longer a nice-to-have skill. It is part of trust.
The patient-explanation problem is not just about time
Doctors often blame the explanation gap on short visits, and time is part of it. But time is not the whole story. The deeper issue is that many conditions are spatial. A compressed verbal explanation is often doing work that should be shared with a simple visual.
This matters in musculoskeletal medicine, cardiology, ENT, gastroenterology, neurology, and any visit where patients need to picture where the pathology is happening. When they cannot picture it, they struggle to understand why a test, treatment, or watchful waiting plan makes sense.
The result is familiar:
- less confident consent conversations - repeated clarification questions after the visit - family explanations that collapse into "something is inflamed" - lower confidence in follow-through
The goal is not to turn every consultation into a lesson. The goal is to reduce ambiguity enough that the patient understands the structure-and-symptom story.
Why this matters now
The AMA's May 20, 2026 patient AI guidance explicitly encourages patients to use AI as support rather than as a substitute for clinicians. That is a useful signal for doctors because it confirms a new reality: patients are increasingly trying to prepare, interpret, and question through AI before and after appointments.
Meanwhile, the AMA's 2026 physician survey includes patient-facing AI and training-related measures, which reflects how closely communication and AI literacy are now linked in care environments.
So the physician challenge is not whether AI exists in the conversation. It already does. The challenge is whether the doctor's own explanation remains clearer, safer, and more trusted than whatever the patient saw before arriving.

The best explanations follow a repeatable sequence
Strong patient explanations usually have the same anatomy:
1. locate the structure
Show where the issue lives in the body.
2. explain the relationship
Help the patient understand what the structure touches, protects, compresses, or supports.
3. connect anatomy to the symptom
Explain why this structure creates the pain, weakness, numbness, pressure, or functional limit the patient feels.
4. connect the symptom to the plan
Make the next step feel logical: therapy, medication, injection, imaging, procedure, or monitoring.
5. confirm understanding
Ask the patient to repeat the explanation in their own words.
What not to do in front of patients
Three habits make explanations worse.
Do not rely on jargon and speed
Fast technical language can make the doctor feel efficient while leaving the patient behind.
Do not use crowded visuals
If the image looks like a textbook page shrunk onto a small screen, the patient will stop following.
Do not make AI the authority
If a physician introduces a chatbot-like explanation without clear clinical framing, the patient may start weighing the device's voice against the doctor's judgment instead of using the visual to understand the doctor's judgment.
That is why patient-facing visual tools must support the physician's explanation, not compete with it.
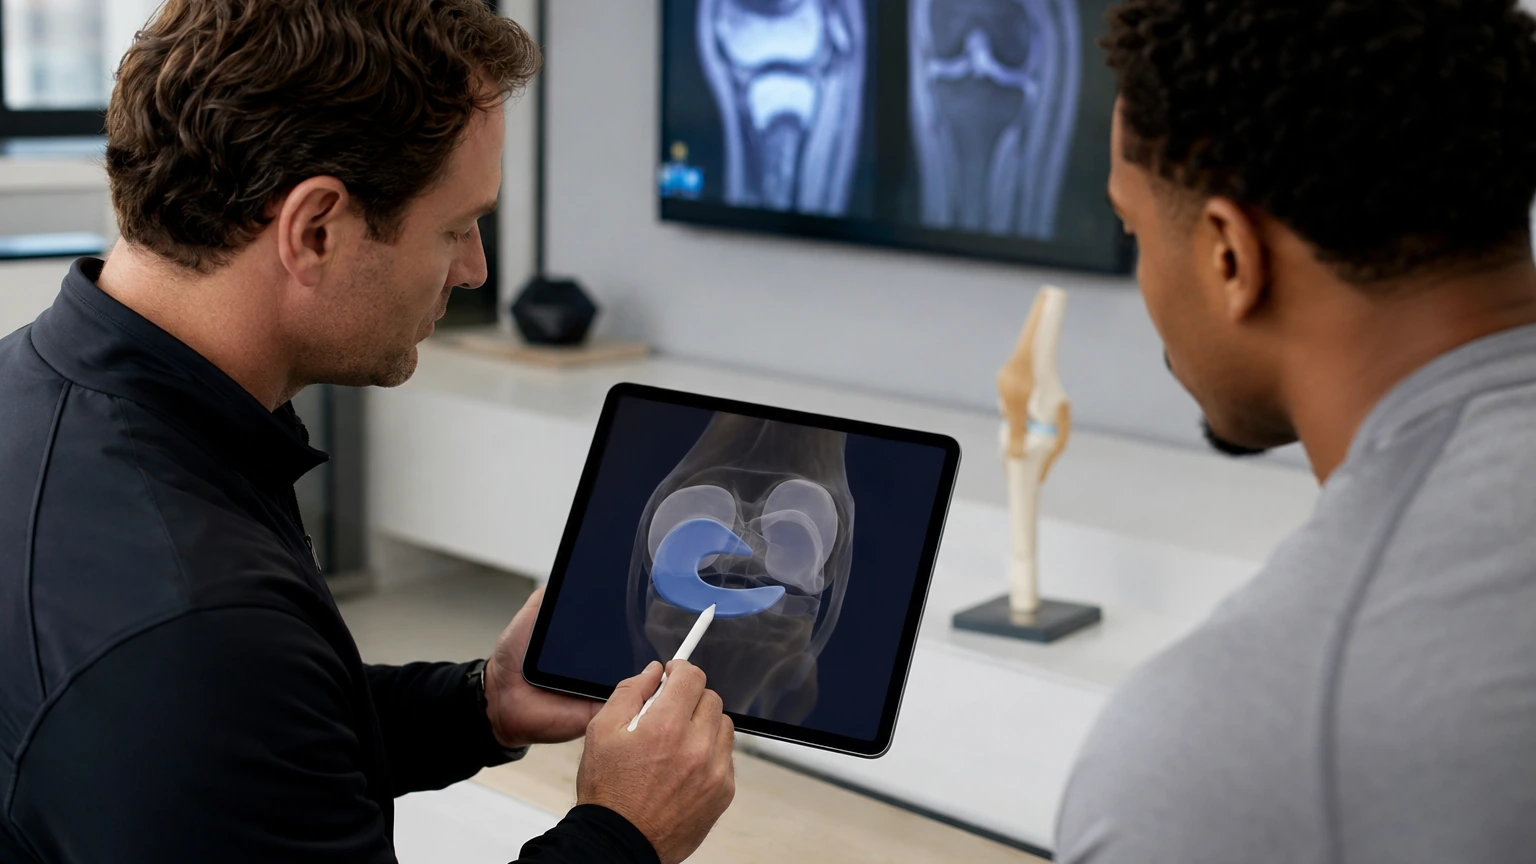
Where a 3D anatomy workflow helps most
This is where structure isolation becomes clinically practical.
The most useful MeduTechs feature for doctors in this lane is Part Isolation inside the Mobile App. It lets the physician focus one structure or pathway at a time so the patient can see the explanation without fighting visual clutter. Supporting tools like the Description Panel and nomenclature toggles matter because they help the doctor move between professional language and patient-friendly phrasing without losing anatomical accuracy.
For clinicians exploring similar explanation workflows, MeduTechs' 3D anatomy for clinics is the most natural internal follow-on read.
A realistic consultation scenario
Imagine a patient with cervical radicular pain.
Without a visual, the explanation often becomes a blur of disc bulge, nerve irritation, posture, and imaging results. The patient may remember only that something is pressing somewhere.
With a clearer workflow, the doctor can:
- isolate the cervical region 2. show where the nerve exits 3. point to the nearby disc or narrowing 4. connect that anatomy to the arm symptoms 5. explain why the initial plan aims to reduce irritation rather than jump immediately to a procedure
That sequence strengthens both understanding and trust because the patient can follow the logic rather than memorize the wording.
The hidden risk to watch
The hidden risk is assuming that because the patient nodded, they understood. In reality, many patients nod through explanations they cannot reconstruct later.
That is why the final check matters. If the patient cannot explain back what structure is involved and why the plan fits, the explanation probably needs to be simplified again.
Another risk is overpromising what visual tools can do. A better anatomy explanation can improve understanding, but it should not be sold as proof of clinical outcome improvement unless the evidence exists. Keeping that distinction clear protects credibility.
Where this helps most in real practice
Doctors often feel the payoff immediately in visits where the anatomy is the reason the recommendation sounds abstract. Think of an L5 radicular pain conversation, a rotator cuff explanation, a deviated septum review, or a valve-disease overview after imaging.
How to keep the tool from taking over
One helpful rule is that the physician speaks first, the visual clarifies second, and the patient explains back third. That order keeps the doctor in charge of the meaning of the image.
In practical terms, that often means the device should appear only after the physician has named the likely structure and the clinical point of the visit. The visual is there to lock in understanding, not to outsource the conversation.
That sequence protects professional trust while still giving the patient something concrete to hold onto after the explanation.

A practical next step for doctors
If patients leave that visit more able to say what is happening and why the plan fits, the workflow is doing its job.
That is especially valuable in consent-heavy or anxiety-heavy visits, where the quality of understanding changes not just recall, but the patient's willingness to participate in the plan with confidence.
When the patient understands the structure, the risk, and the rationale, the rest of the conversation tends to become calmer and more collaborative.
That is often the difference between a patient who passively agrees and one who actively understands.
And active understanding is usually what makes the plan stick after the patient goes home.
Sources and further reading
- The effectiveness of visual-based interventions on health literacy in health care: a systematic review and meta-analysis - New AMA infographic helps patients safely navigate AI in healthcare - AMA Augmented Intelligence Research: 2026 Physician Survey